
One of the first things on everybody’s mind when they start a new website is to produce as much content as possible. After all, we want to get those backlinks, and we want to get a consistent stream of visitors to your website, right?
Months go by, and you start to see more and more traffic coming it. This is a good indicator that you’re on the right track to solving the same problems that your product is solving through the media you’re creating and promoting.
But did you know that the average lifespan of a webpage is around 100 days? According to Brewster Kahle, digital librarian at the Internet Archive in San Francisco, links tend to go bad over time due to moved or deleted content or changes in permalink structure.
So this means that the beautiful, exciting experience your visitor is expecting can turn sideways when they are greeted with the dreaded 404, or “page not found” message.
One error page can kill all your hard work.
And what will the visitor do? They will hit that back button in their browser and go straight back to the search result page, trying to find a website that CAN help them with their problems.
Your first opportunity to impress a new lead, and you just blew it. Outdated and permanently moved web pages will leave your leads hanging without you allowing them to start a loving relationship.
No wonder that according to a 2010 study by Firefox, the back button was the most used navigational feature in their browser.
Although there is no formal estimate of the number of lost sales and opportunities caused by people landing on a “page not found” page, we’re pretty sure every lost sale opportunity is one to money.
It isn’t all bad news, though, because 404 pages also represent opportunities if done well. If someone lands on your 404 page, you have their attention. How you use that attention directly relates to how successfully your site will convert visitors.
This article will focus on turning those 404 error pages into revenue, leads, and sales.
Table of Contents
[hide]
- Prevention is better than a cure
- Finding Broken Internal Links
- Google Search Console (free)
- W3C Link Checker (FREE)
- Broken Link Checker (FREE)
- Screaming Frog SEO Spider Tool (FREE / $259 Per Year)
- Finding broken external links using MonsterInsights (WordPress plugin)
- Finding and fixing 404 errors caused by internal and external links using Google Analytics Custom Reports
- Tracking 404 errors with Google Analytics and Google Tag Manager
- Fixing 404 error pages to recover traffic and generate leads
- Using redirects to fix broken pages to recover traffic
- Permanent redirects on WordPress using Rank Math
- Permanent redirects on WordPress using Redirection
- Creating permanent redirects on Apache
- Creating permanent redirects on Nginx
- Elements of a successful 404 page
- Be transparent about the issue
- Provide visitors with a solution to their problem
- Don’t be afraid to add a touch of personality
- Create an opportunity for a conversion
Prevention is better than a cure
Although we just told you that we’re going to focus on turning those 404 error pages into revenue, the first thing you want to take care of is ensuring people don’t end up on that dreaded 404 page in the first place of course.
It might feel a bit counterintuitive, but this page is probably the only page on your website that you’ll actively try to reduce traffic towards, even though you will optimize it for success.
Basically, visitors tend to end up on your 404 error page in two ways. They end up on your 404 page because of internal and external broken links, and you need to try to fix both.
Finding Broken Internal Links
Let us take a closer look at how you can find broken links on your website.
Google Search Console (free)
Every webmaster should have subscribed her or his website to Google Search Console, as it is one of the great tools Google offers to help you identify things that are going wrong on your site. One of those great tools is a way to find 404 errors and broken links.
After logging into Google Search Console and going to your website, you can find the information on the Crawl Statistics page (found under Settings > Crawl Statistics).
That page will display site errors and URL errors for desktops, smartphones, and feature phones. URL errors are categorized, with server errors, soft 404 errors, and normal 404 errors all being shown separately.
It is worthwhile going down the list and checking each error. Sometimes you might have removed a page from your website, and you can fix them using a simple redirect.
W3C Link Checker (FREE)
A second free tool out there that you can use is the link checker by the World Wide Web Consortium (W3C). It might look a little bit less fancy than the Google alternative. Still, since W3C is responsible for maintaining standards on the website, their link checker should be recommended as an impartial tool by a lot of people.
Broken Link Checker (FREE)
If you’re using WordPress just like us, then we can recommend the Broken Link Checker plugin as well. The plugin will scan your entire database and displays the links that are broken. It will highlight the HTTP status code, the link text around it, and the post or page in which the link can be found.
After that, you can select the broken links and choose to mark them as not broken, remove the link, etc. The great thing about the plugin is that it can automatically scan your entire website regularly and email you whenever it finds something.
Finally, the plugin can also monitor outgoing links to YouTube, Vimeo, and other video sites and then report to you if that video has been removed.
Screaming Frog SEO Spider Tool (FREE / $259 Per Year)
The last tool we want to highlight should be in every SEO specialist’s toolbox. Screaming Frog SEO Spider. Besides finding broken links, it can give you a lot of more detailed information on how your website is doing on a technical SEO level.
Things like missing header tags, meta information, errors, etc. If you’re not having an XML sitemap generated automatically for your website by plugins like Yoast SEO or Rank Math, then Screaming Frog can even do that for you.
The tool is available for Mac, Windows, and Linux, it has a free version with a crawl limit of 500 URLs, or you can get a premium version for $259 per year.
Finding broken external links using MonsterInsights (WordPress plugin)
Using Google Analytics, you can quickly identify other websites sending traffic to pages that are non-existent on your page. The best thing, of course, would be to follow up with the owners of those sites to ask them to update their links, but sometimes this could take a while, or you might not get a response at all.
The faster solution is to let people automatically redirect to the correct new page where they should go to. In technical terms, you can do this using a 301 (permanent) redirect by editing your .htaccess file directly on the server.
If you’re less technical and if you’re on WordPress, there are great plugins available as well that can help you with this.
Of course, checking your Google Analytics every day might be a bit time-consuming. To make your life easier, you can also set up a custom alert in Google Analytics, automatically notifying you when someone arrives at your 404 error page.
To do this, you need to create a goal in analytics using the URL of your 404 page.
- Go to your property in Google Analytics > “Admin” > “View” > “Goals”.
- If you’re using the MonsterInsights plugin on WordPress, it will automatically tag your 404 pages for you making your life a lot easier.
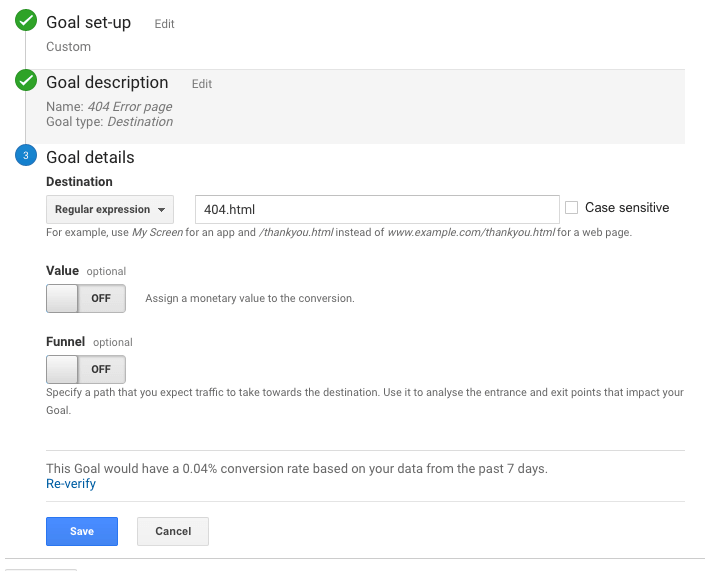
- Create a new goal by pressing “+NEW GOAL”
- In the “Goal set-up,” select “Custom”
- Give your goal a name like “404 Error page,” for example
- Type “Destination”
- As a destination, you will use “Regular expression,” and in our case, since we use the MonsterInsights plugin, you will use 404.html
The next step is to create a “Custom Alert.” Following the following steps:
- Go to your property in Google Analytics > “Customisation” > “Custom Alerts”
- In the next screen, choose “Manage customized alerts”
- “+NEW ALERT”
- Use the following settings and hit “Save Alert”
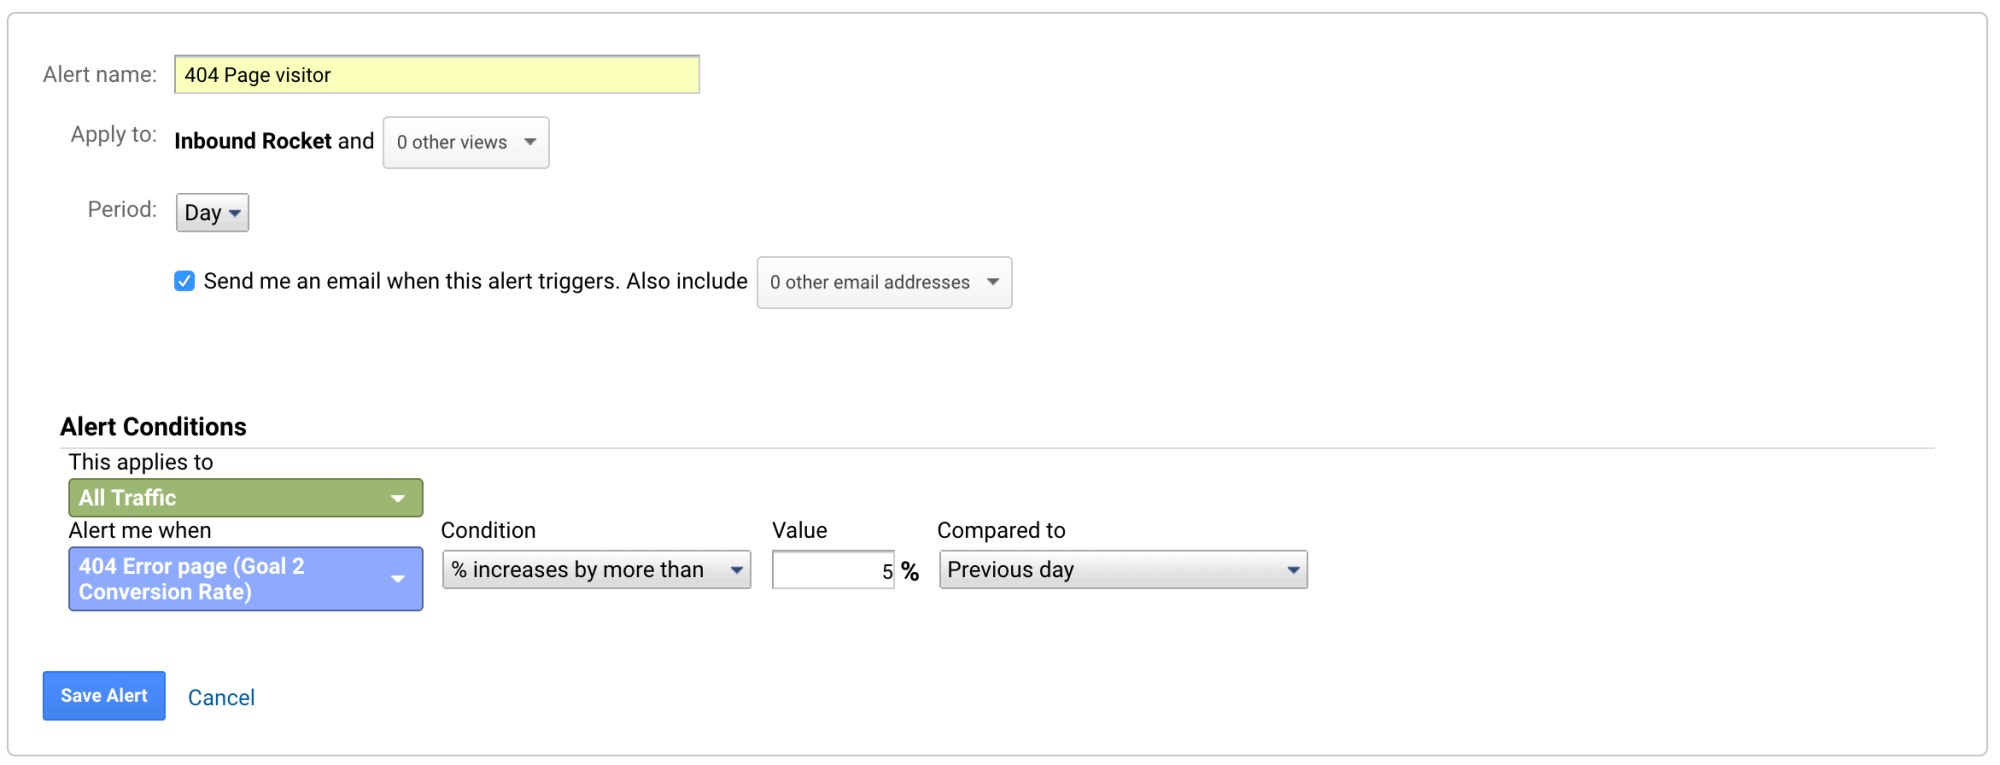
From now on, you will be notified when there is a more than 5% increase since the previous day.
Finding and fixing 404 errors caused by internal and external links using Google Analytics Custom Reports
It is not just the other pages on the internet that could cause 404 errors. Sometimes you might have internal links, linking to pages that don’t exist anymore. Since these are on your own website, it is easy to fix them as soon as you find them. Internal links that cause a 404 error are bad for the user experience of your website, and they can also harm your SEO performance.
Thankfully using Google Analytics you can quickly create a custom report that shows you which pages are linking to non-existent pages:
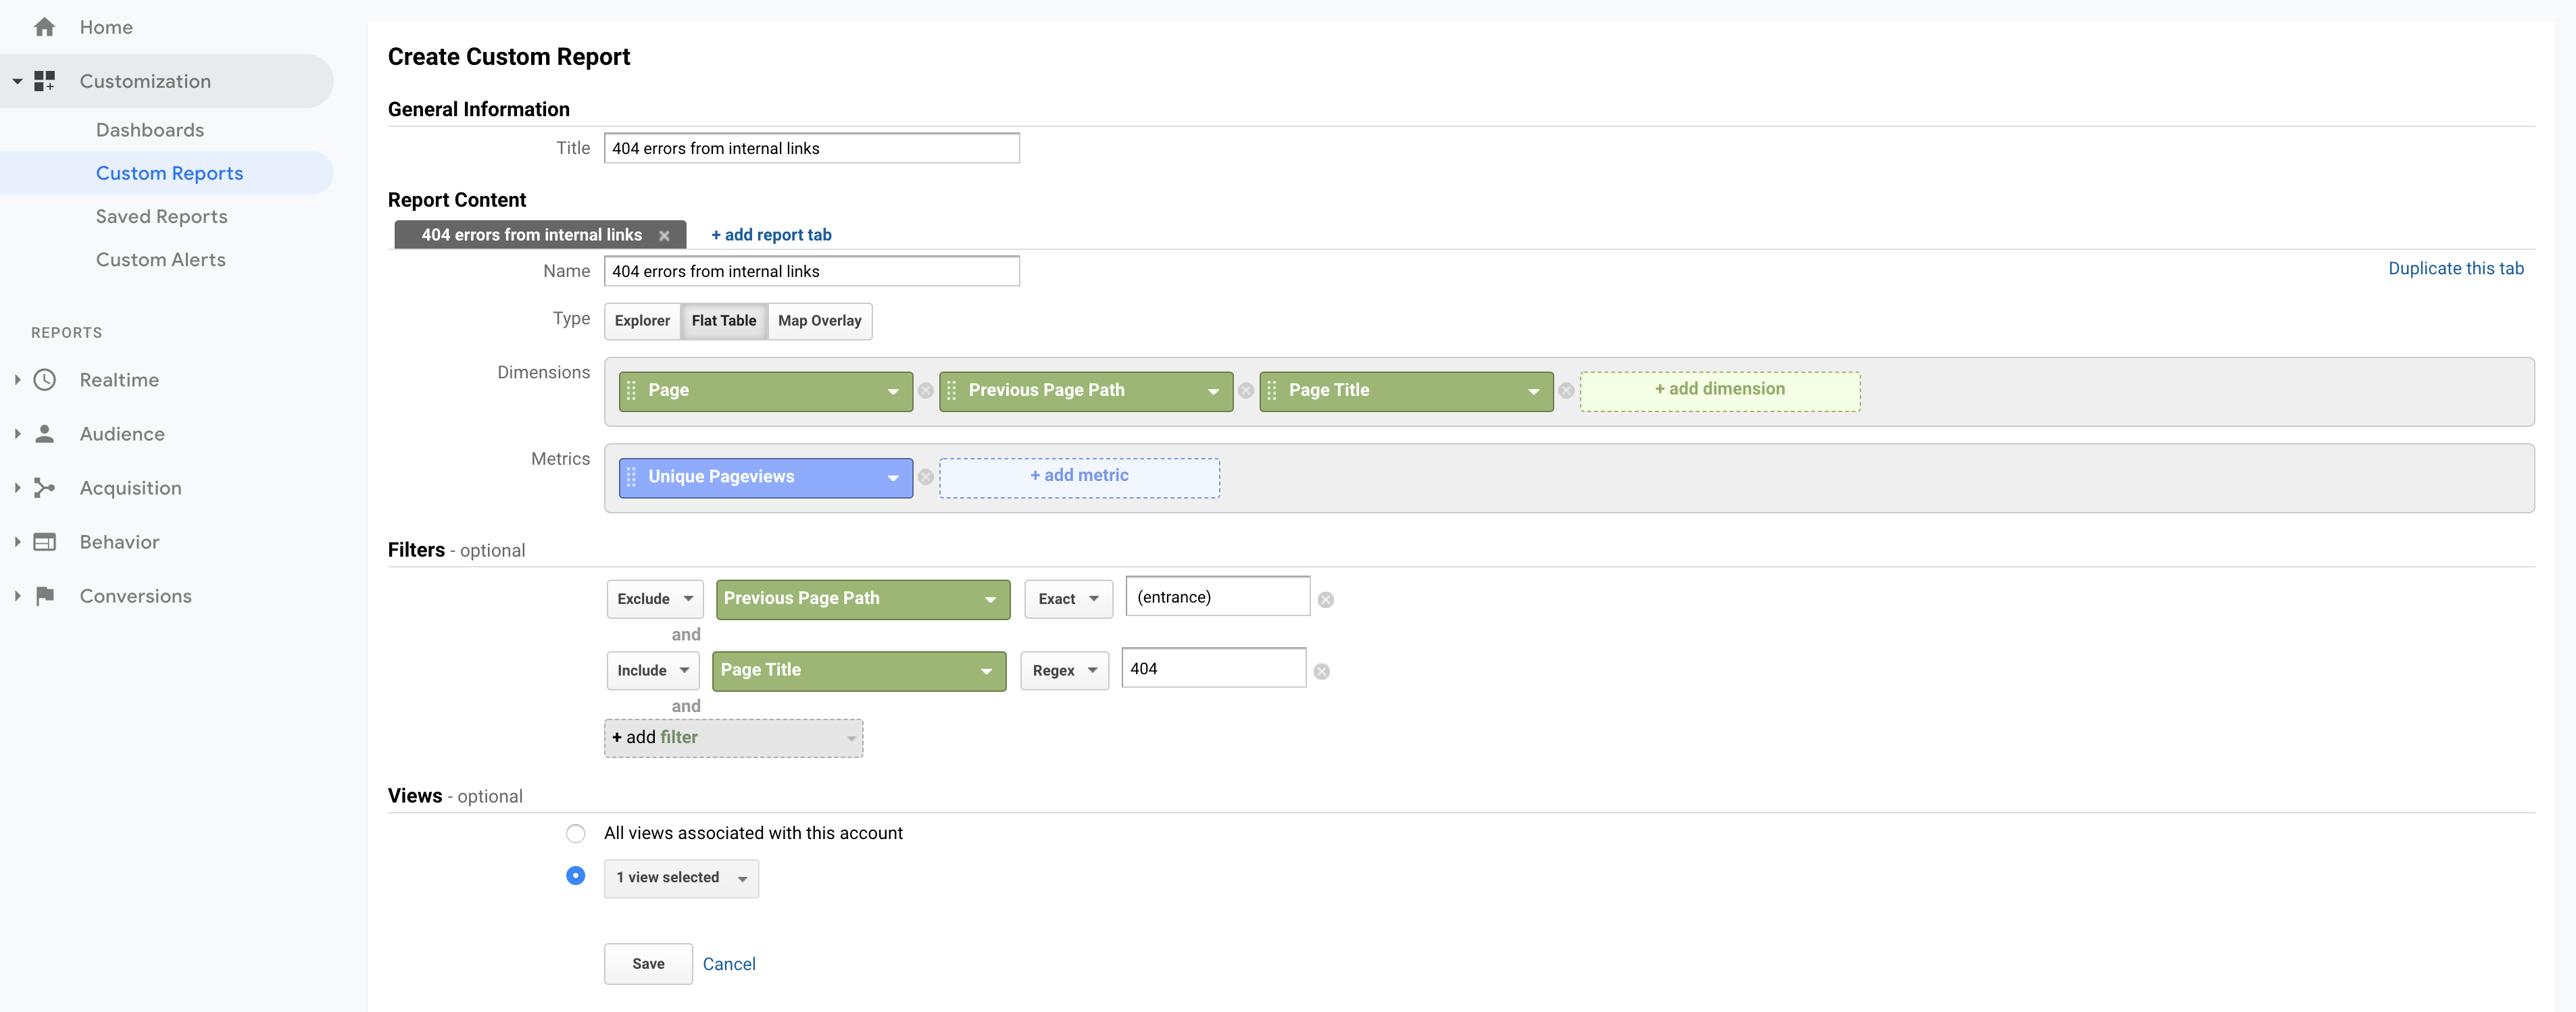
Go to Customization > Custom Reports in Google Analytics and click on +New Custom Report.
- Select the report type Flat table.
- Select the dimensions Page, Previous Page Path, and Page Title.
- Select the metric Unique Pageviews.
- Add a filter that excludes the value(entrance)for the dimension Previous Page Path. This filter makes sure that only 404 errors that were preceded by a page view on your own website (and thus caused by an internal link) show in the report.
- Add a Regex filter for the page title that contains the expression that helps you identify your 404 error page (“404” in the example below, but it could also be “page not found” or something else, depending on the title tag of your 404 error page – go to a URL you know is broken on your website and look at the source code to identify your title tag).
Now, if you save the report and open it, you will see the following columns:
- Page: URL of the page that caused the error.
- Previous Page Path: Page that links to the false URL (in most cases).
- Page title: Title of your 404 page.
- Unique Pageviews: Number of sessions this error happened in.
Just like you can create a Custom Report for the broken internal links, you can also create one for the external websites that generate 404 errors. As you can see, the process is almost the same:
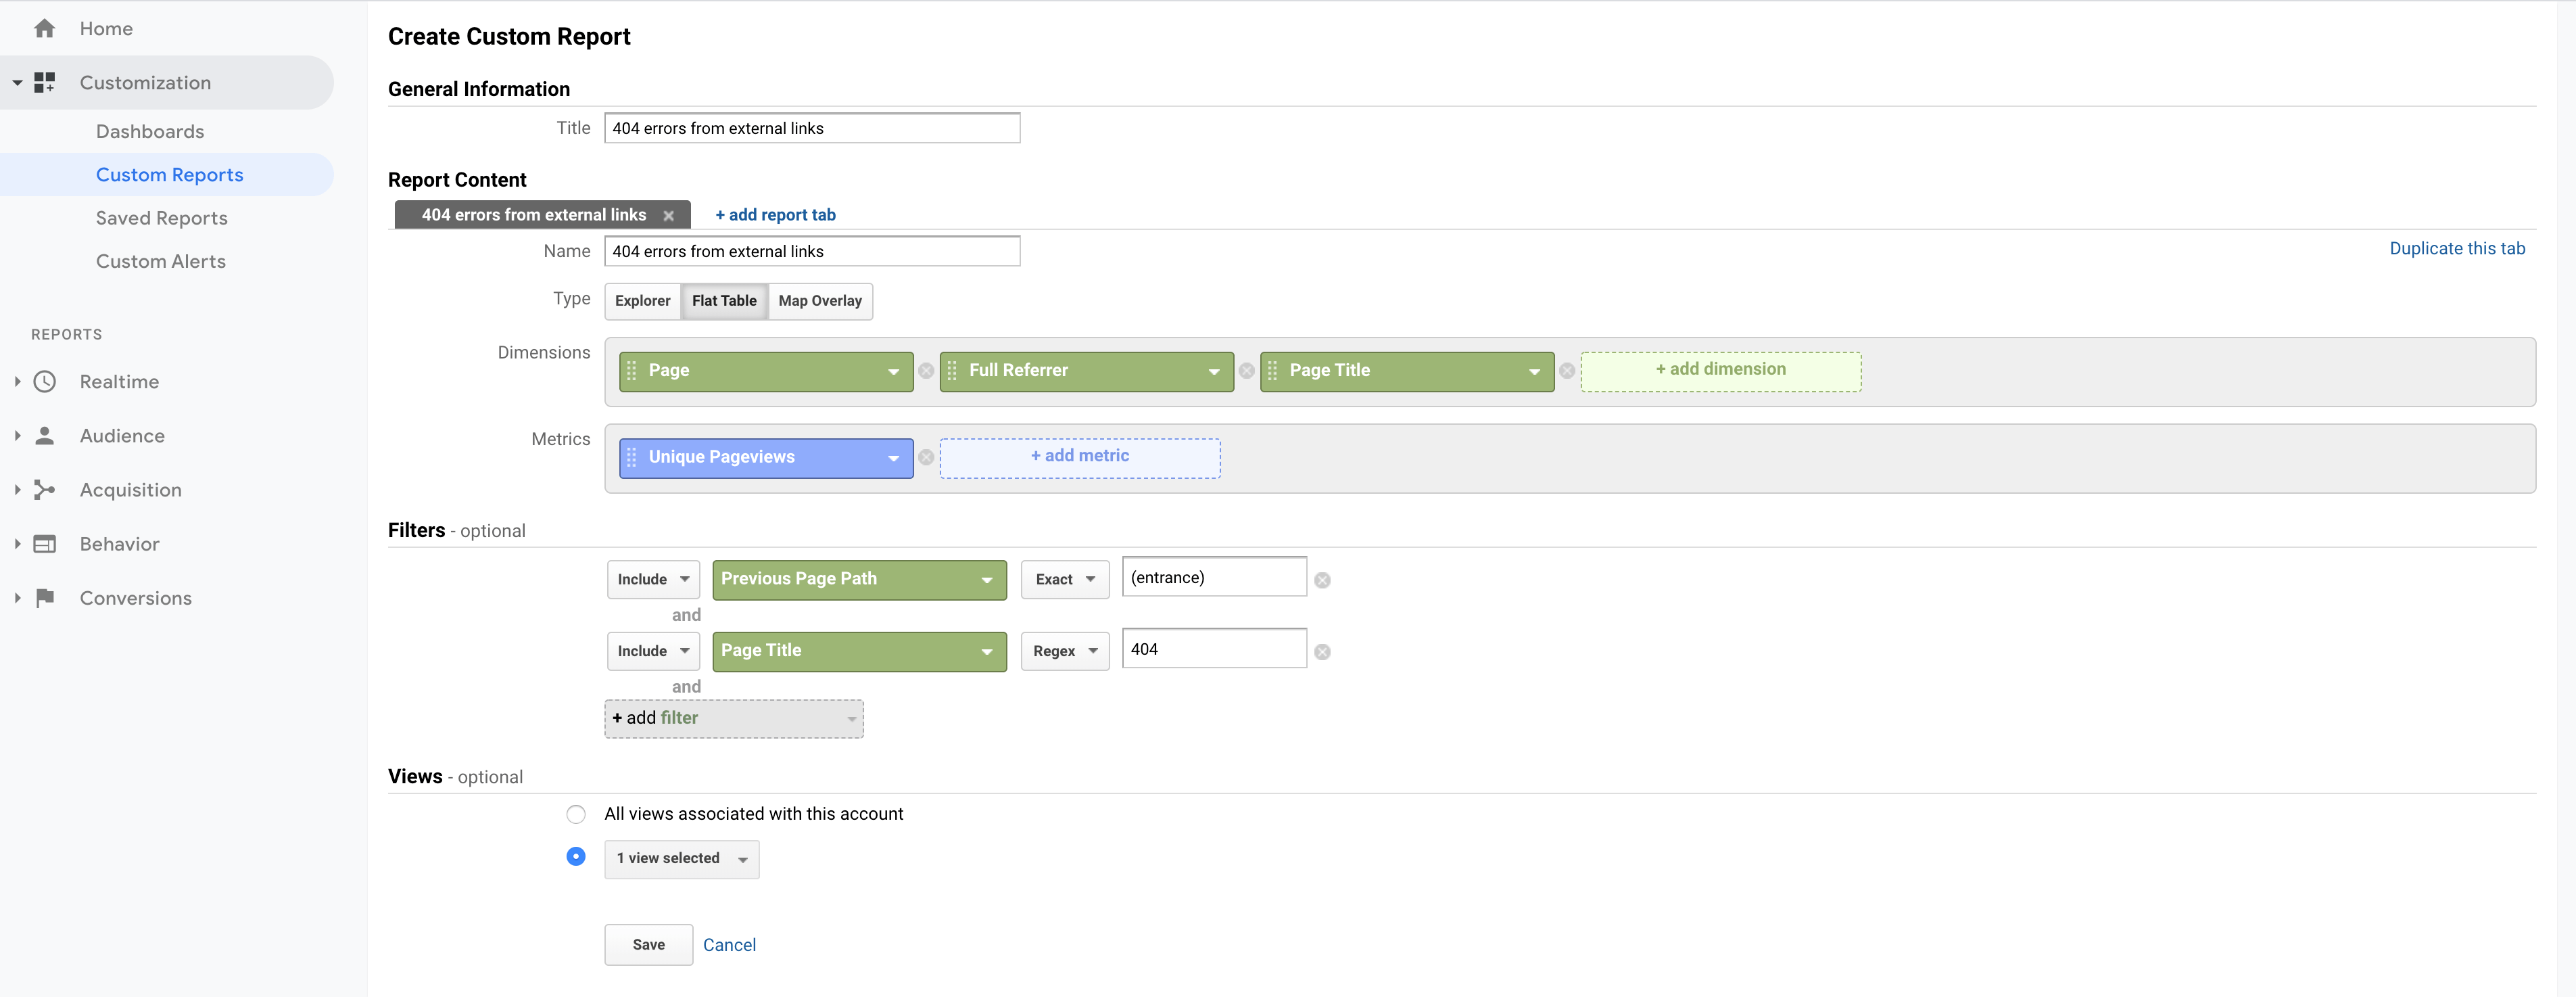
- Go to Customization > Custom Reports in Google Analytics and click on +New Custom Report.
- Select the report type Flat table.
- Select the dimensions Page, Full Referrer, and Page Title.
- Select the metric Unique Pageviews.
- Add a filter that includes the value (entrance) for the dimension Previous Page Path. This filter makes sure that only 404 errors that were not preceded by a page view on your own website (and instead caused by an external link) show in the report.
- Add a Regex filter for the page title that contains the expression that helps you identify your 404 error page (“404” in the example below, but it could also be “page not found” or something else, depending on the title tag of your 404 error page).
Now, if you save the report and open it, you will see the following columns:
- Page: URL of the page that caused the error.
- Full referrer: Page on another website that links to the false URL. Please note: In lots of cases, this will not help you actually find the faulty link, as it includes referrers like “Google” for clicks from search results, and lots of referrers are not passed correctly. Focus on referrers that actually look like URLs of pages that are linking to your content.
- Page title: Title of your 404 page.
- Unique Pageviews: Number of sessions this error happened in.
Tracking 404 errors with Google Analytics and Google Tag Manager
The last way to track 404 error pages is by combining Google Tag Manager (GTM) and Google Analytics. You can identify when a visitor encounters a 404 error by firing a Google Analytics Event using Google Tag Manager.
As we already know, one of the easiest ways to identify a 404 page from a normal page is by using the page title.
Sadly, this variable is not directly available in GTM, so you must create a user-defined variable Javascript – Page Title.
Log into your GTM account, go to Variables, and create a new one with the following settings:
- Title: Javascript – Page Title
- Type: Javascript
- Global variable name: document.title
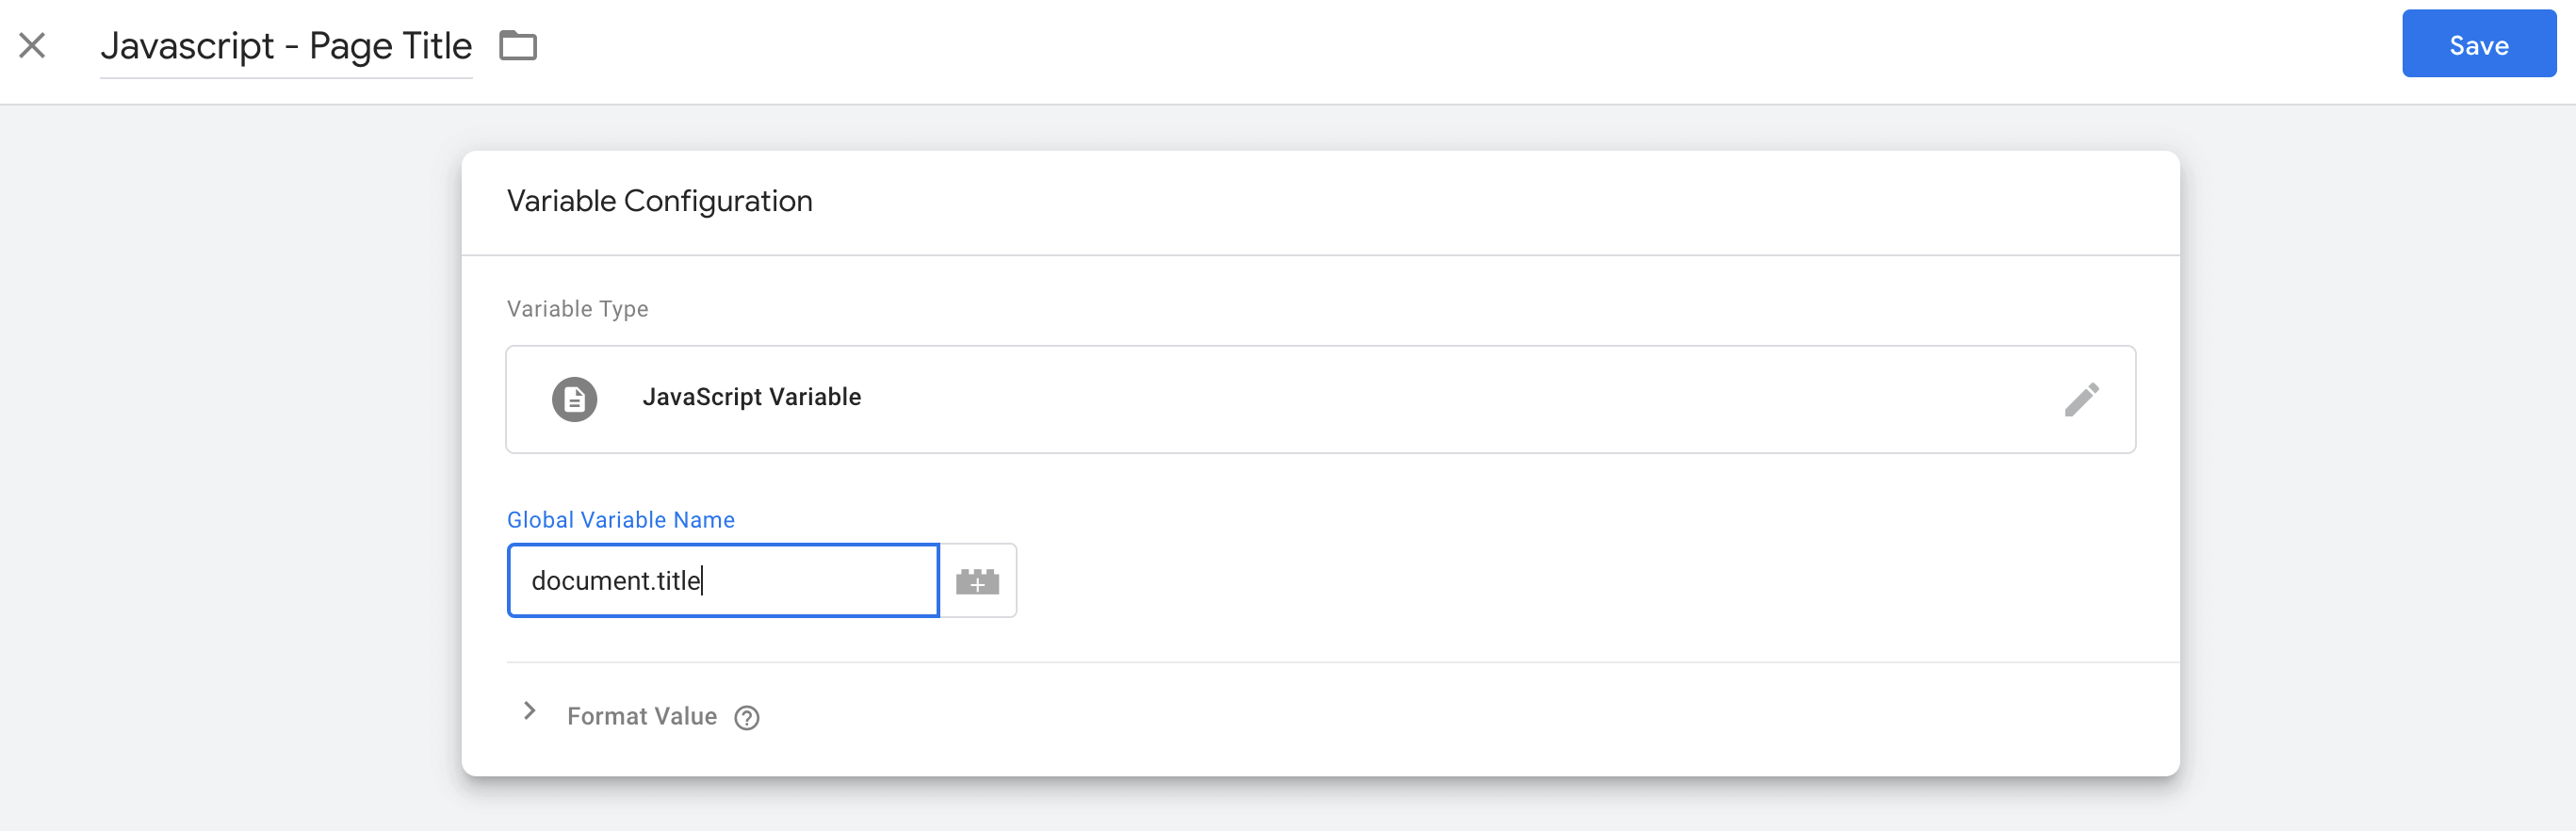
This variable will return the value of the title of a page that a visitor is currently viewing.
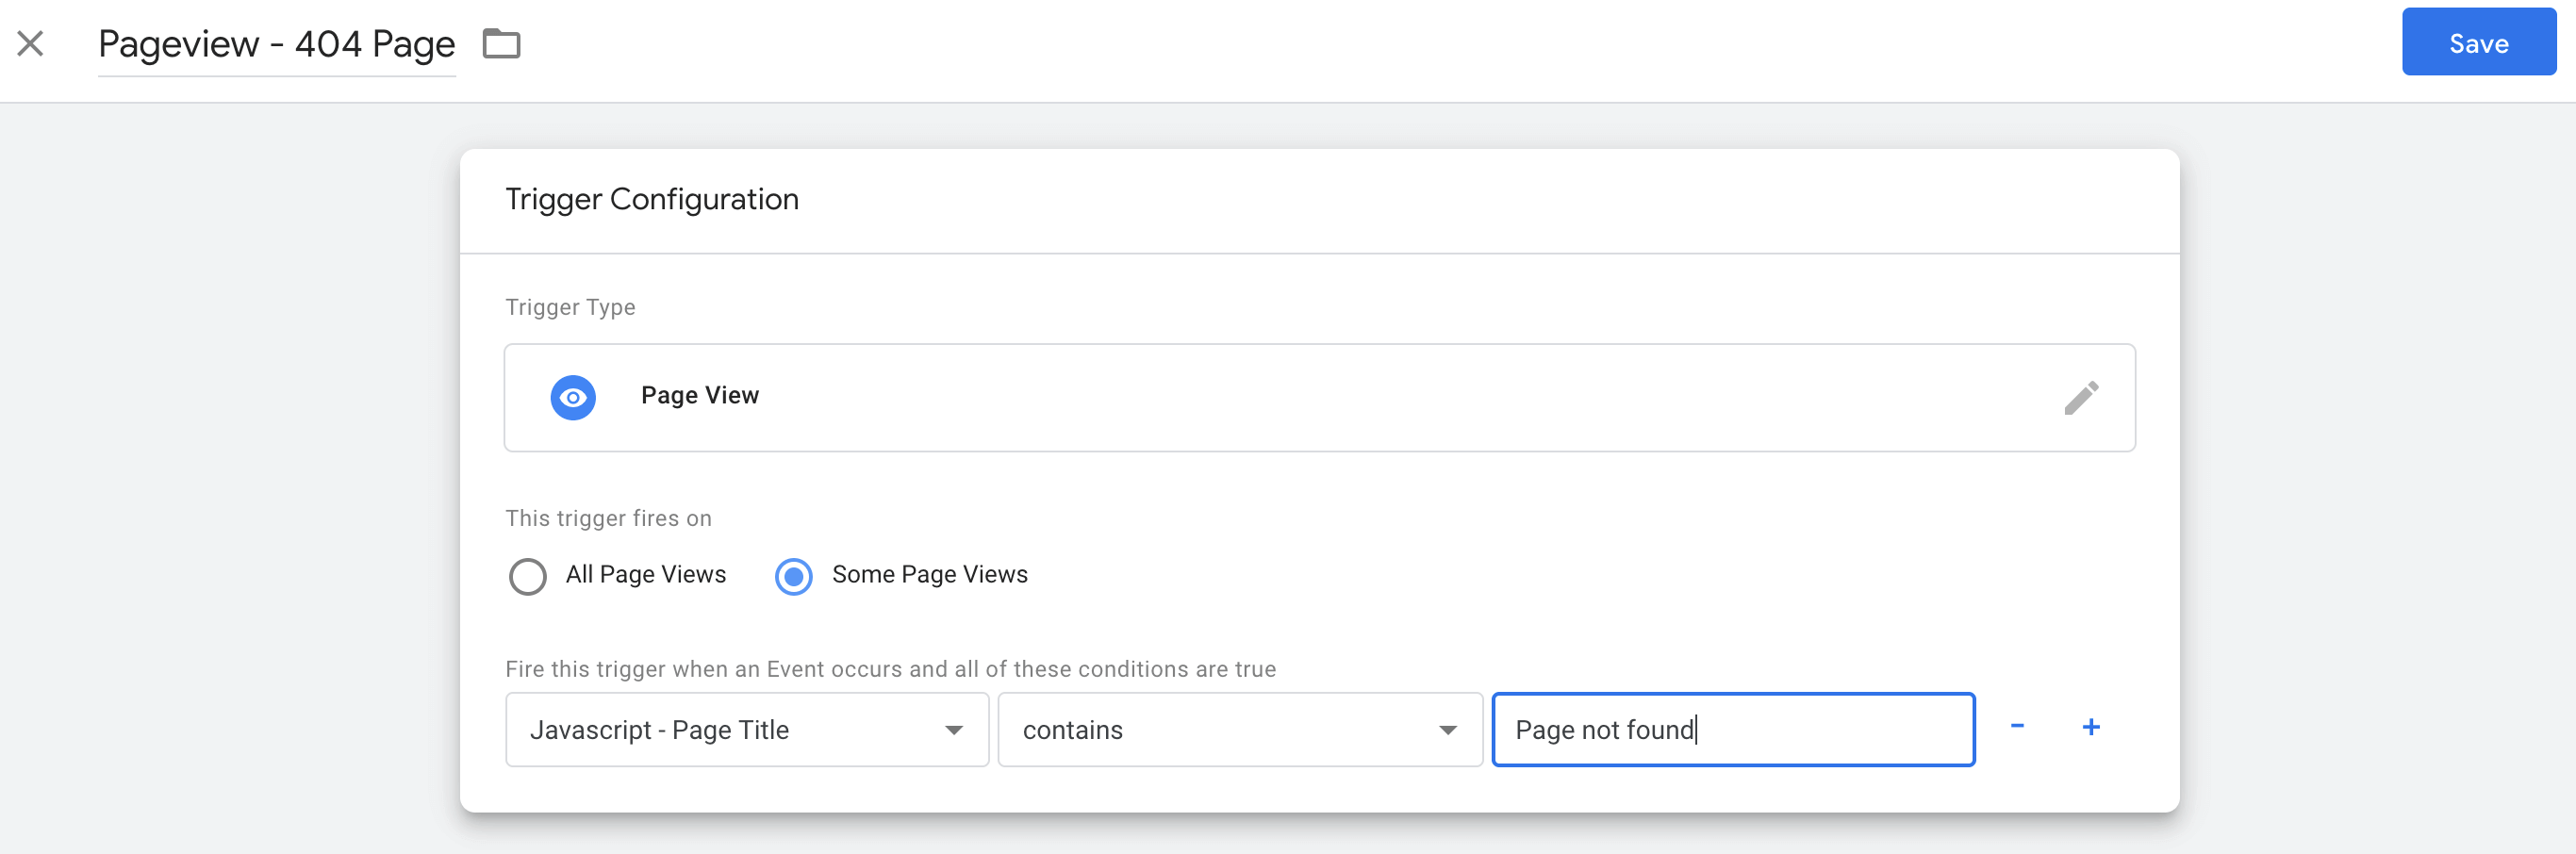
After that, you must create a trigger that fires when the page title contains “Page not found” (or the equivalent of the title of your 404 page).
Head over to triggers in GTM and create a trigger with the following settings:
- Title: Pageview – 404 Page
- Trigger type: Page View
- This trigger fires on Some Page Views
- Fire this trigger: Javascript – Page Title (the variable you just created) – contains – Page not found
Important to know here is that this trigger is case-sensitive. So if the title of your 404 error page is “Page Not Found,” then this trigger won’t work because “Not Found” ≠ “not found.”
If you want to be absolutely sure that it will work, you can otherwise change the “contains” part in the trigger to “matches RegEx (ignore case)”:

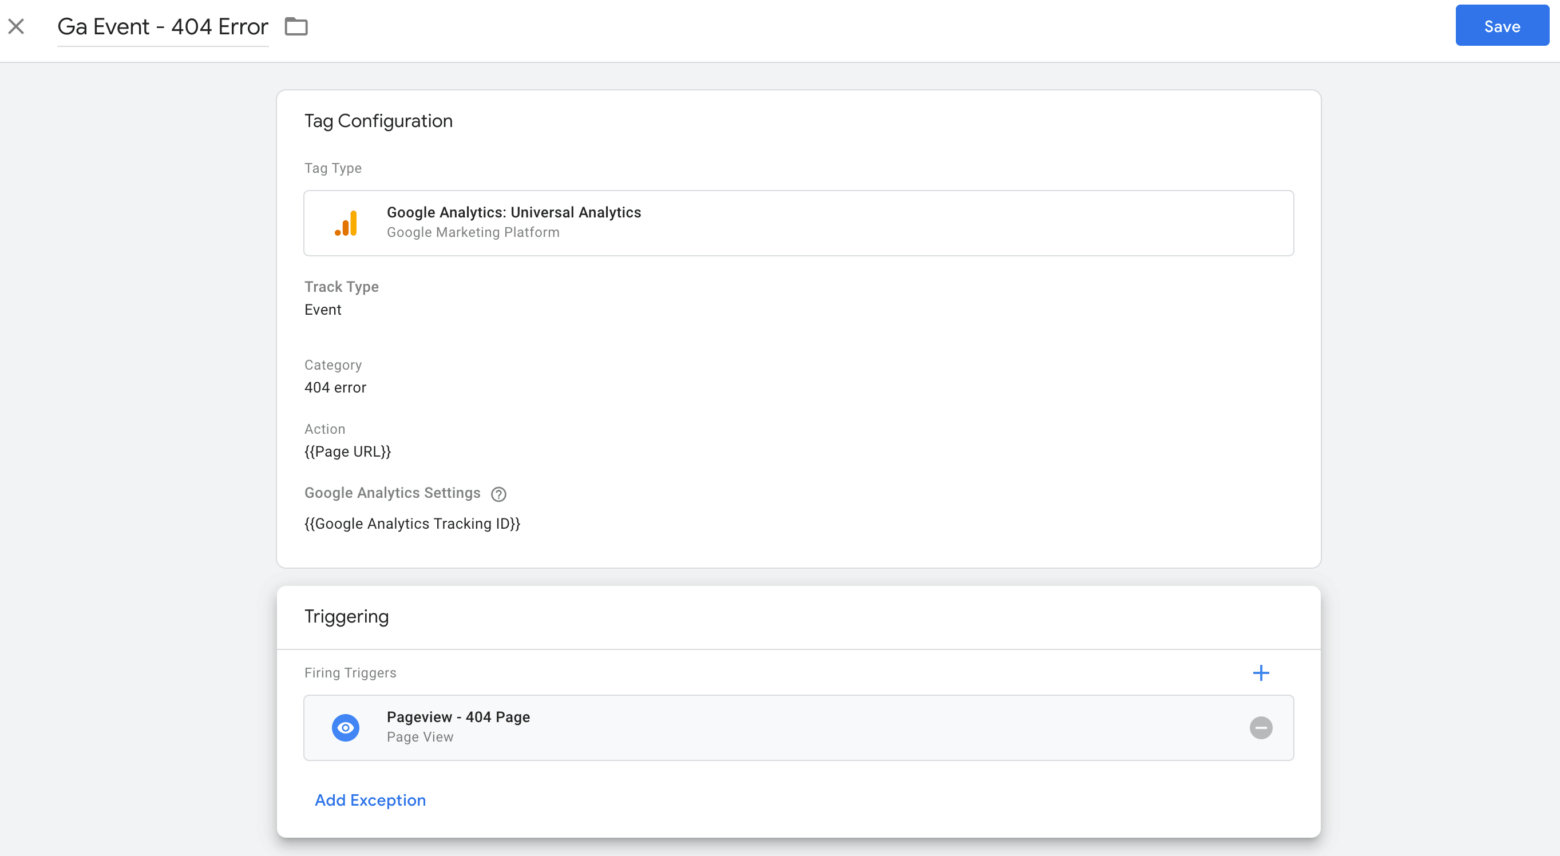
The final step in Google Tag Manager is to send the 404 Errors as Events to Google Analytics. To do this, go to Tags and create a new tag with the following settings:
- Title: GA Event – 404 Error
- Type: Universal Analytics
- Enter Tracking ID (if you still don’t do it, we highly recommend adding Google Analytics Tracking ID as a constant variable. This will save you a lot of time and hassle in the long run).
- Track Type: Event
- Event Category: 404 error
- Event Action: {{Page URL}}. Every time this event is fired, Google Tag Manager will dynamically fill in the Page URL (full web address) as an event action. This lets you see which URLs get the most 404 error hits.
You can also use {{Page Path}} instead of {{Page URL}} if you wish. If your web project spans multiple domains and all data is visible in one Google Analytics account, then you should definitely stick with {{Page URL}} as an event action. - No-interaction hit: true
- Link previously created trigger Pageview – 404 Error to this Universal Analytics tag.
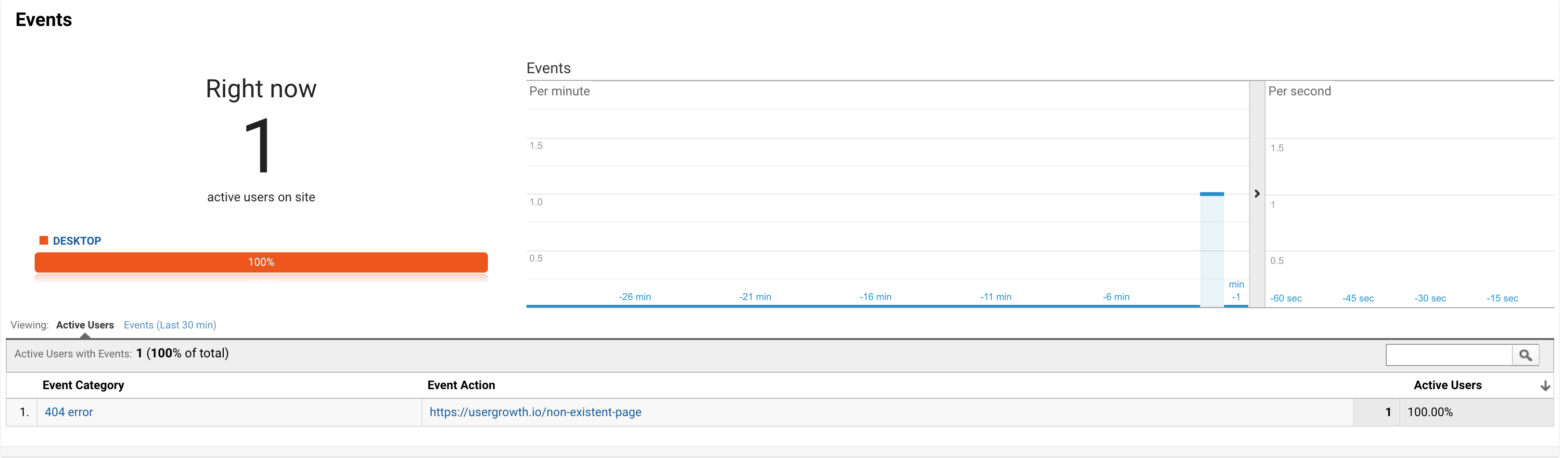
Hit that Save button, and enable “Preview & Debug” mode so you can test if you did all the steps correctly, and it ONLY fires when it is supposed to. You can test this simply by going to your Google Analytics real-time reports. Enter a URL that you will know doesn’t exist, and your 404 events should appear in your real-time report within seconds.
Identifying and fixing any broken links regularly is only the first part, though. You can never prevent all potential errors, so there still might be a chance that people end up on your 404 error page.
In the second part, we will be looking at how to optimize your 404 error page, so you can still make the best out of a terrible situation.
Fixing 404 error pages to recover traffic and generate leads
Using redirects to fix broken pages to recover traffic
Okay, now what? Once you’ve started tracking 404, you can now learn more about how visitors interact with your website. You know which pages lead up to dead ends.
Most of the time, a 404 error page is created when a URL changes. For example, you’ve edited a web address to add relevant keywords for SEO. If that page were already indexed by Google, new visitors would be redirected to the old address, a page that no longer exists.
Now you know which pages are creating 404 errors; it is time to redirect them to a new home, the URL that replaced the previous page. The best way to do this is using 301 redirects or permanent redirects. Depending on your server configuration and CMS that you’re using, there are a couple of options:
Permanent redirects on WordPress using Rank Math
As mentioned earlier, Rank Math not only allows you to keep an eye on whether you are getting 404 errors on your site, but you can also directly create redirects for them or pro-actively (automatically or not) set up a redirect the moment a page changes URL. Ensure you have enabled the redirection module under “Rank Math > Dashboard > Modules.
Then you can either set up a redirect via the 404 monitor or via “Rank Math” > Redirections, where the options are pretty extensive to set up redirect:
![]()
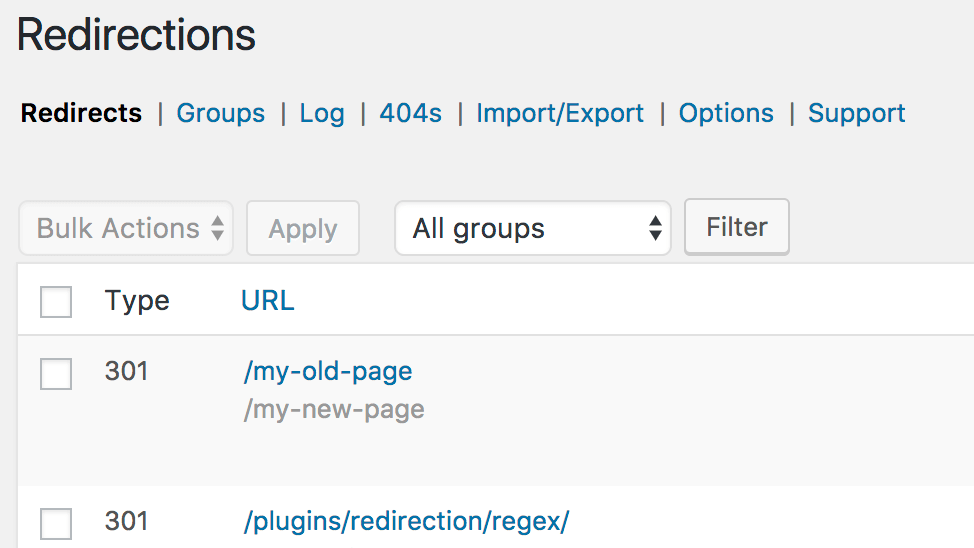
Permanent redirects on WordPress using Redirection
If you’re using WordPress you can use a plugin called Redirection, which allows easy redirect creation straight from the admin panel.
Creating permanent redirects on Apache
If you’re using Apache as your webserver you can easily create a redirect on your website using a .htaccess file. Place the following line into your .htaccess where you, of course change the relevant variables:

Alternatively, you can use the following:

Creating permanent redirects on Nginx
If you’re using Nginx as your web server, you have to go a bit deeper and go to the configuration file of your website. In the server block, you can add the following line:

Elements of a successful 404 page
And what about prevention? To make sure that whatever page you were not able to identify before, you can still help your visitors and maybe even create an opportunity to generate leads.
The best 404 error pages should almost be considered as a great landing page. With as few distractions as possible. After all, you want them to turn into happy leads for your company, right? Or, as Renny Gleeson puts it:
A simple mistake can tell me what you aren't. Or remind me why I love youClick To TweetSo what are the necessary elements that can help you create a frictionless journey and retain your lost visitor?
Be transparent about the issue
The first feeling most people have when ending up on an error page is that they did something wrong.
A negative feeling.
Trying to make it even worse for them? Letting them arrive at the generic 404 error page that your web server is generating. That initial feeling and confusion might be enough to let them hit that back button and never return.
So the first thing you want to do is take away that negative feeling and start explaining what might be the cause of the issue in your content. Explain to them why they aren’t getting the content that they were expecting.
Sympathize with your visitor, and explain what might be the reason that they ended up on that page. Maybe it was a typo in the URL. Maybe it was a faulty redirect.
At the end of the day, everybody can make a mistake. Addressing the elephant in the room and showing them that you’re human and that you understand the negative feeling just like them makes it more personal. And at the end of the day, people like to feel that they’re taken seriously by a human being, by other people, instead of a machine.
Just make sure to explain the issue in ways that your ideal customer, your visitor, would understand. If you’re a website focused on baking cupcakes, don’t get too technical. If you’re slashdot you can make a more technical reference. Otherwise, keep it simple.
Provide visitors with a solution to their problem
Once someone understands the reason for the issue, it’s time to provide them with a solution, a fix, so they can continue their journey toward the content they were looking for.
“Focus on the user, and all else will follow” Wise words from Google with a profound truth.
Focusing on your user means helping them with a solution so they can get the information they were looking for.
You can give a couple of different options they can follow that will make sure they are on the right track:
- A search bar: A search bar is one of the easiest and quickest ways you can help someone find the content they are looking for. They can search through your content the way they want instead of your automatically forcing them somewhere
- Suggested search results: Next to having a search bar, you could also use the URL contents the visitors landed on to use as input already in a site-wide search and show them potential content they might be looking for. Smashing Magazine has a great article on this topic, showing you how your developer can use the Google Search API to give the results you want.
- Quick links: In addition to potentially already the correct content using the suggested search results, you also provide the visitor with 4-5 quick links that will lead to the most visited pages on your site. If a visitor has landed on your 404 error page, there might be a good chance they were trying to visit one of those high-traffic pages on your site. Ideally, you would also include your perfect About Us page in there, for example.
- Contact information: Lastly giving the visitor the ability to communicate with you straight away shows that you’re there to help them and that you want to work together with them to solve the issue. An added benefit of them contacting you is that you can also quickly identify any errors on your website that you might not be aware of.
Don’t be afraid to add a touch of personality
As we said in the first point of optimization, everybody can make a mistake. It’s what you do after that makes up for it, though.
Sometimes, the 404 page is someone’s first interaction with your website, with your brand. Wouldn’t you want to make this as positive and on-brand as possible?
By using a bit of your company’s personality on that page, by introducing them to your brand’s tone of voice, your brand’s colors, and look and feel, maybe with a little bit of extra humorous personality, you can turn that frown upside down.
People need to be invested in your company regardless of what page they are on.
Create an opportunity for a conversion
Sometimes the best discoveries are those you weren’t expecting to find. A 404 error page is the perfect place to capitalize on that saying.
Your first reaction might be, can I convert people on a page like this? But It’s just about directing the user to take the action you want them to take.
And what’s better than turning a lousy user experience into a positive and profitable one?
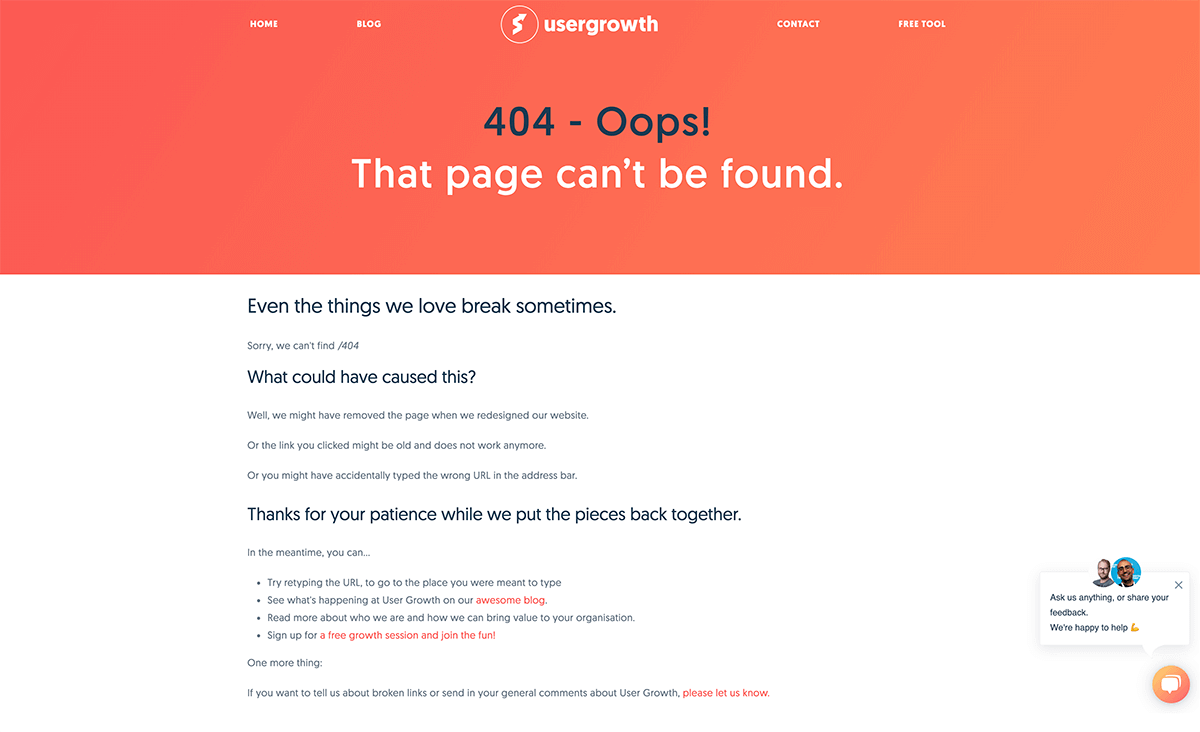
At User Growth, for example, we offer visitors the opportunity to ‘schedule a free growth session’ on our error 404 page. The other three options above the free growth also align with our conversion goals.
Or maybe you can offer your visitor a coupon for a discount to be used in your webshop? After all, a discount is a strong reason for the visitor to continue shopping on your site after already being let down.
Another great way to increase leads is to add your newest promotion to the 404 page. While focusing on lead generation, you’ll be adding new promotions to your website regularly. Why not turn your 404 page into a landing page with a small form to capture the visitor’s details, offering your latest e-book, checklist, or video?
The key here is to tell visitors what you want them to do. If you want them to shop for garden equipment clothing, give them a link that says shop the garden’s section – don’t send them to the home page where they might get lost or distracted.
Taking advantage of that opportunity will help get your visitors into the funnel, help make you appear more helpful to your visitors, and depending on the offer, can even help delight your current visitors.
While 404 error pages are often the pages that are forgotten the most when designing the optimal user experience, they can be a valuable addition to your business lead generation.
No matter what the reason is that someone ended up on that 404 error page, it’s how you help them during this time of frustration that’s going to keep them on your site and without a bad taste in their mouth. You simply need to be creative and let the visitor know that you’re sorry. By doing this, you create trust with the user, and they will want to stick around.
What 404 optimization tips do you have? Any best practices you’ve encountered in your days wandering around on the internet? Share your thoughts in the comments below!
This entry was posted in Conversion Rate Optimization. Bookmark the permalink.
Want to learn more about growing your business through digital marketing? Looking to take your business to the next level? Let’s talk!
If you want you can easily unsubscribe with a single click at any time.
To turn lost visitors into customers I developed a custom “Smart Error 404 Page” that. When the webserver triggers an Error 404 Event: 1. The webserver logs an Error 404 Code. 2. Randomly displays anyone my web pages without any manual action from the website visitors! 3. Sends an Email to the website Administrator with detail information about the Error 404 event. This allows the website Administrator to: ❓ Determine if a Single IP Address or Range of IP Addresses needs to be BLOCKED 🚫 from visiting the website in the future. 🔎 Analyze the content of the Error 404… Read more »
Hey Raul,
a potentially interesting approach, mostly around the logging etc. (although all that information can already be found normally in your logs). What I wonder though is why would you serve your visitor a random page from your website, that has the enormous potential to not be what they were looking for and as a result leave them feel disappointed?
Why not try to help them find the answer they were looking for in the first place?
This is one of those things that most people, including our organisation, completely overlooks. Will definitely have to go through these steps at our website!