
Google Search Console (or Google Webmaster Tools, as some of you might remember the name) is a free platform from Google that allows anyone with a website to monitor and troubleshoot how Google views their site and optimize your organic presence based on the learnings you get from the tool.
Things like referring domains, mobile site performance, rich search results, which search queries are bringing in the most amount of traffic, and to which pages, the list goes on and on.
Sure, it is not required to sign up for a Google Search Console account to have your website appear in the search results. Still, the insights it can provide are super valuable because they can help you understand better how your site is viewed in the eyes of Google and adjust accordingly. And can help you diagnosing potential technical SEO issues on your website that prevent you from ranking in Google.
According to Google itself, Search Console allows you to:
- Confirm that Google can find and crawl your site.
- Fix indexing problems and request re-indexing of new or updated content.
- View Google Search traffic data for your site: how often your site appears in Google Search, which search queries show your site, how often searchers click through for those queries, and more.
- Receive alerts when Google encounters indexing, spam, or other issues on your site.
- Show you which sites link to your website.
- Troubleshoot issues for AMP, mobile usability, and other Search features.
Chances are you’re not alone responsible for your company’s digital marketing. You probably have colleagues or work with a digital marketing agency like User Growth. In this case, you’ll need other people to have access to the information in your account so they can view data and make improvements.
This article will give you a step-by-step overview of how you can add your website to Google Search Console for your business and how to share access with another user or agency so they can help you out with your digital marketing efforts.
Note: this article is part of a bigger series where we teach you how to share access with your content marketing, SEO, and paid media agency, like User Growth. You can find the other articles by following these links:
- Tutorial: How to Share Access to Google Analytics
- Tutorial: How to share access to Google Tag Manager
- Tutorial: How to share access to your Google Business Profile (formerly Google My Business)
- Tutorial: How to add a user or agency to Google Ads
Table of Contents
- How to add your website to Google Search Console
- What is the difference between owners, users, and other permissions in Google Search Console
- How to submit your sitemap into Google Search Console
- Who should have access to Google Search Console
- Can't we just share a Google account for access?
- How to share access to Google Search Console
- What to do when changing SEO agencies in Search Console?
- How to request access to Google Search Console
- How to share Google Search Console data with your Google Analytics
How to add your website to Google Search Console
Before you can start to add other people to your Google Search Console (GSC), be sure to first sign up for GSC. Adding your website to GSC is quite easy and straightforward:
- Head over to Google Search Console at https://search.google.com/search-console/.
- Sign into your Google Account. Double-check that you’re using your business Google account and not your personal Gmail account 😉
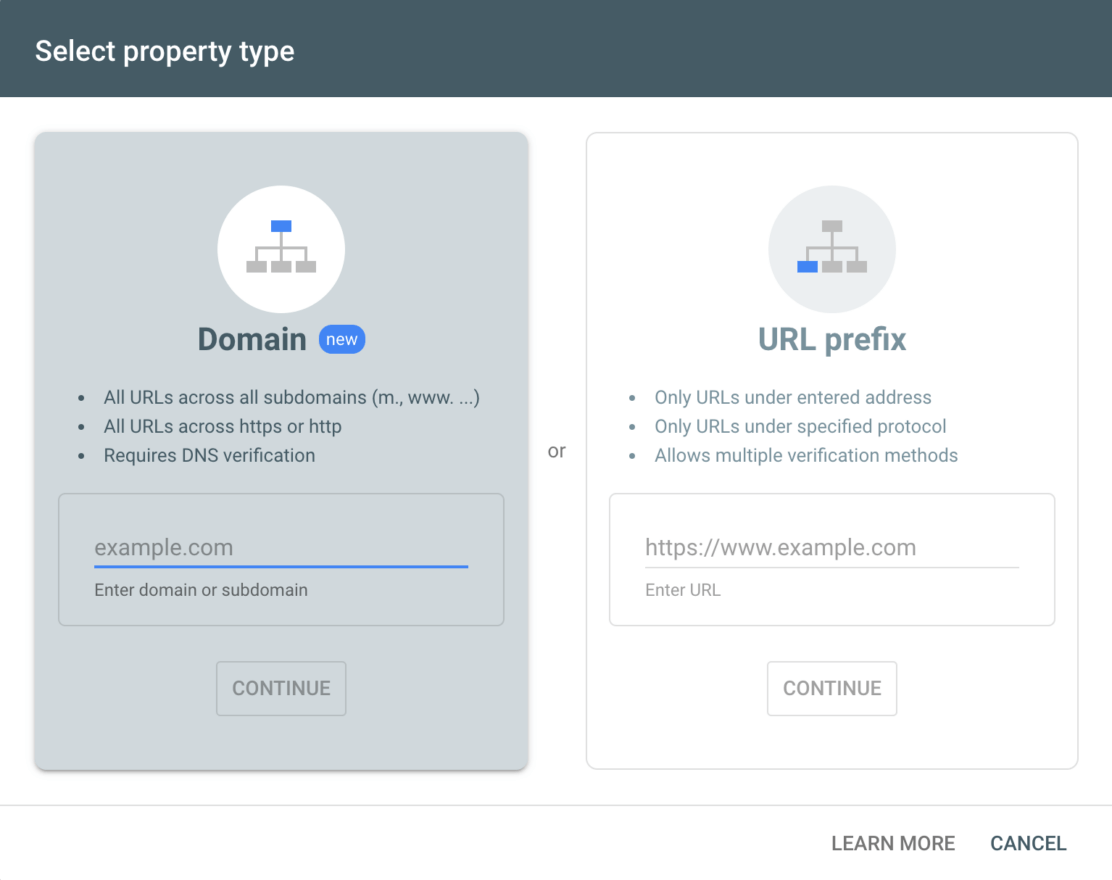
- Click “Add a property”
- You are now presented with two options. The easiest way is to choose the URL prefix option, as you don’t need to have access to your DNS records to add a verification, and there is a high probability that your website is only accessible on one domain (e.g. https://www.yourawesomedomain.com). Make sure to enter the full URL (including http:// or https:// and www. (or no www if you’re not hosting your website on the www subdomain).

- Click “Continue”
- Choose one of the available options to verify your website. You can either upload an HTML file to your website, add an HTML tag on your website, use your existing access to Google Analytics to prove you should have access to this information, you can use Google Tag Manager, or, the most difficult option, use your DNS provider.

- That’s it. If your site is reachable under both http:// and https:// or maybe you have different subdomains like app.yourawesomedomain.com and blog.yourawesomedomain.com, you must also add each of these options individually.

The good news is that even if you can’t verify immediately, Google starts tracking data into your property the moment you add it!
What is the difference between owners, users, and other permissions in Google Search Console
In Google Search Console, there are basically only two levels of access a person have:
- Owner: As an owner, you have full control over a Google Search Console property. You can add and remove new users, change settings, and basically do everything. You can either be a verified owner (you completed the property verification process) or a delegated owner (you’ve been added by a verified owner but did not verify the property yourself). Delegated owners can still add other delegated owners.
- User: When you’re a full user, you can see all the data in the GSC property, and you can take some actions, but you don’t have permission to add new users. Full users can see most data and are allowed to take some actions, while restricted users can only view most data.
Although there aren’t many options to choose from, you should still think carefully about who you will be giving which permission level, as you don’t want people that should not share the full ownership with people that don’t need it. Only give people the level of access they need.
How to submit your sitemap into Google Search Console
This step is optional if you did not create a property for your website before in Google Search Console, or maybe you’ve already created a property but never submitted a sitemap? Sitemaps are important for helping your content get discovered by search engines, and by telling Google where your sitemap is located for your website, you make it a lot easier for them to discover all the content that you have on your site.
Sitemap?
A sitemap is a file that is located on your website (and, most of the time, fully generated by plugins like Yoast or RankMath if you use WordPress as a CMS). That file has all the info about all your pages, videos, blog posts, and other files on your website and the relationship between them.
Google and other search engines can easily read this file and use it as a quick reference, like a directory for finding and crawling all the content on your site. It can also tell search engines when the content was last updated, how often the content is changed, and if there are for example, alternate language versions for a piece of content on your site.
Googlebot relies on href links to hop from page to page, and a sitemap is a way of giving Googlebot a nice, clean, and simple list of each one.
Submitting your sitemap to Google Search Console can be done in five simple steps:
- Find the sitemap page on your website. Finding a website’s sitemap can sometimes be challenging as the location and URL structure may vary. A few ways to locate it include:
- Searching Google using terms like
"site:example.com filetype:xml"or"site:example.com inurl:sitemap" - Directly visiting the URL www.example.com/sitemap.xml (most common location)
- Checking the HTML page if one is available to visitors, commonly found in the footer
- Examining the robots.txt file to see if the sitemap is referenced there.
- Searching Google using terms like
- Find and locate the correct Google Search Console property: It’s important that you find the correct property for the exact domain which you want to submit your sitemap from. Just check in the top right corner if the property is the correct one, otherwise, click on the chevron down and select the correct property from the list

- From the left-hand menu, navigate to “Sitemaps,” which is part of the “Indexing” menu.
- Here you will now see if you’ve already submitted any sitemaps in the past and if they are giving errors, and you can submit your (new) sitemap. Just enter your sitemap URL and press “Submit”
- Google will now verify that the submitted sitemap can be found and read, and you’re all done. It might take a little bit of time before the sitemap is fully crawled, but that is out of your hands.
- Find the sitemap page on your website. Finding a website’s sitemap can sometimes be challenging as the location and URL structure may vary. A few ways to locate it include:

Who should have access to Google Search Console
At User Growth, we believe anyone creating content on your website or running technical things on your website. Some example roles that could use the benefit of having access (even restricted user access) to see the impact of their work are:
- Content Writers
- Web Marketers
- SEO’s
- DevOps
- Security People
Can’t we just share a Google account for access?
Short answer? No!
The longer answer, sharing any account, whether it is your personal account or a company email account, can lead to many security issues. Some problems that might come from sharing your account access are:
- What happens if someone with the account details leaves the company?
- When you look at the Search Console Users list, how do you know who has access?
- Do you really want a Copy Writer to have full Admin access to your site in Google?
- What happens if someone changes the shared Google Account password? They forgot the password and just reset it, and now everyone has to update their password managers (they use them, don’t they!?)
As a rule of thumb, never share your (company) Google Account access to access Google Search Console, Google Analytics, Google Tag Manager, or any other Google tool. Please create individual access for individual people.
How to share access to Google Search Console
Now that you have the basics set up and know the importance of sharing access only via other people’s email accounts, how do you share an individual Google Search Console property with a colleague or with your marketing agency?
- Go to your Google Search Console property
- In the left-hand menu all the way at the bottom, choose the option “Settings.”
- In the settings overview, click on “Users and permissions.”

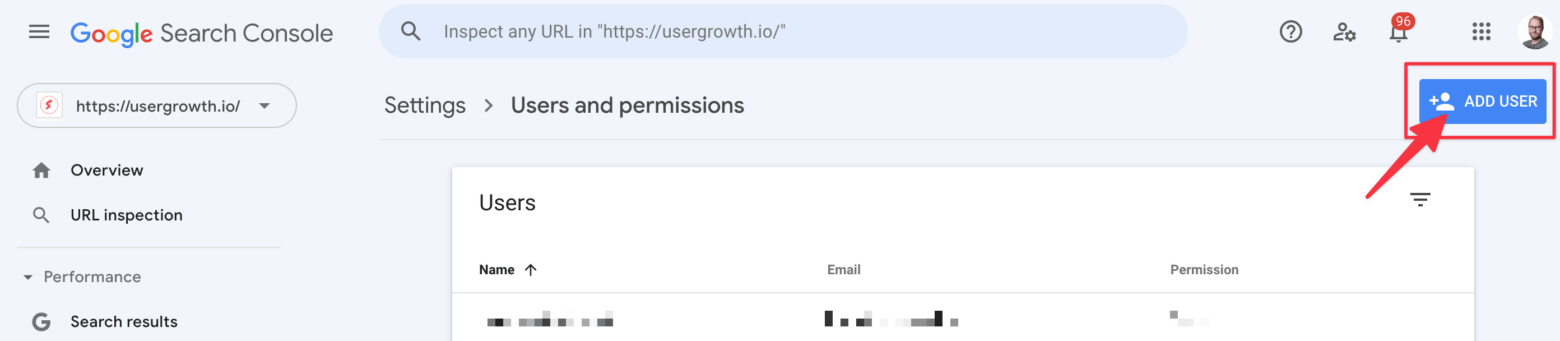
- On the new page that is loaded, click on “Add User” in the top right corner

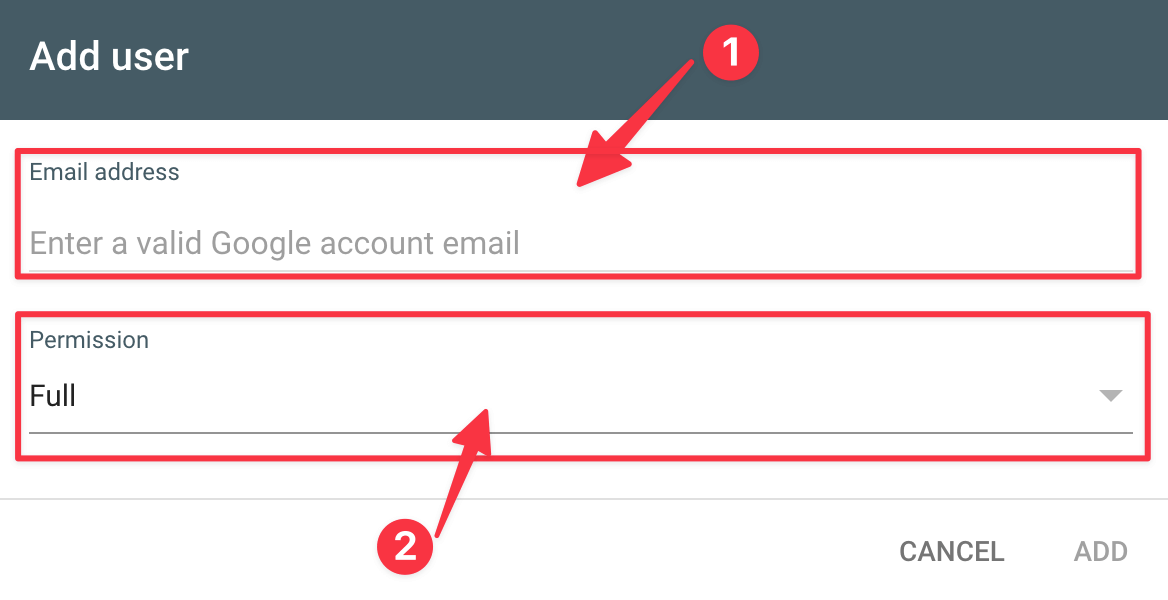
- In the overlay, enter the email address (1) of the person you want to add and choose the correct permissions (2) you want this person to get. Remember as a good security habit, ALWAYS set the permissions to the lowest to get the job done. Meaning most of the time you should just set the permissions level to “Restricted” access.

- Click on “Add”, and the new user will get access. The User and permissions screen will update in a couple of seconds with that new User’s account.

The moment you end the collaboration with that person, don’t forget to go the that same “Users and Permissions” tab under settings to remove their access as well!
What to do when changing SEO agencies in Search Console?
Every now and then, you should review who has access to your Search Console. John Mueller from Google recommends that you, as the website owner, always be the verified owner in Google Search Console. He shares more best practices in the below video:
How to request access to Google Search Console
Unfortunately, you can’t request access to the Google Search Console property of someone else. You must ask your client or colleague with full access to add you as a user. You should share this article with them so they know how to share the access 😉
How to share Google Search Console data with your Google Analytics
Google Search Console and Google Analytics (GA) are probably the most important free site monitoring tools for every business owner and webmaster there are out there. And almost all businesses have either one or a combination of the two set up to help grow their business online.
While both tools are from Google, they still hold different data. Google Search Console can give you relevant data about what is happening on the search result pages, and Google Analytics shows you what is happening the moment someone arrives on your site.
But did you know there is a way you can combine the data? Allowing your Search Console data to show up in your Google Analytics account?
This can help you to look up all related data in one consolidated manner without having to switch browser tabs all the time. You can do this by linking your Google Search Console property with your Google Analytics property.
Requirements before linking GSC with GA:
- You need to have added and verified your site property in Google Search Console
- You need to have added and verified your site in Google Analytics
- You should be the owner/administrator of both of these accounts
After you make sure all the requirements are met, head over to settings (from the left-hand menu at the bottom) and choose “Associations”.
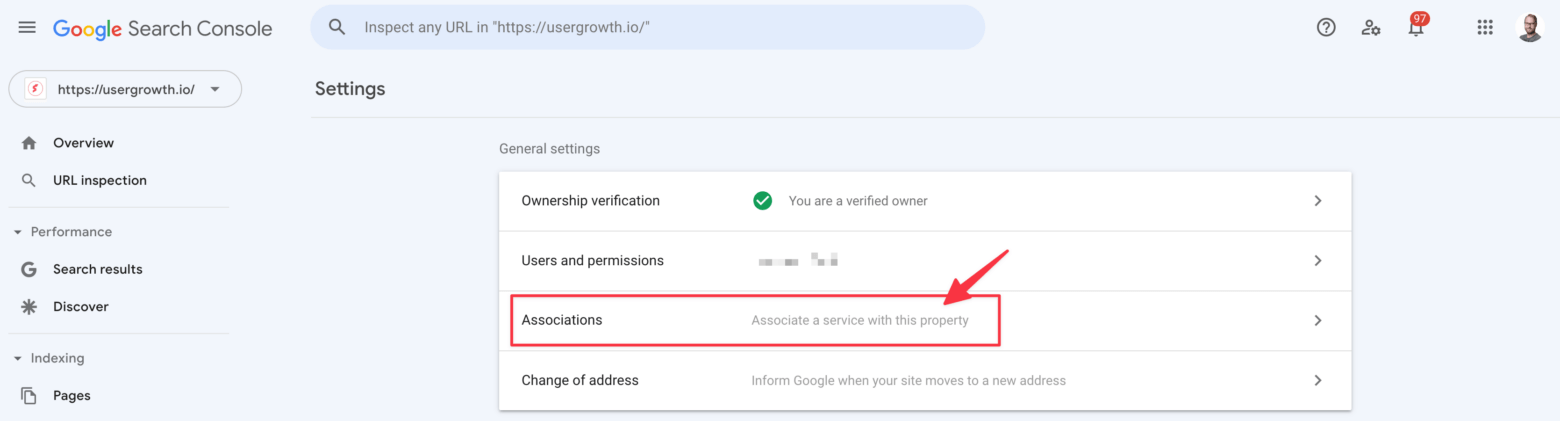
After that, click on the big button “Associate” and select the correct Google Analytics property from the overlay
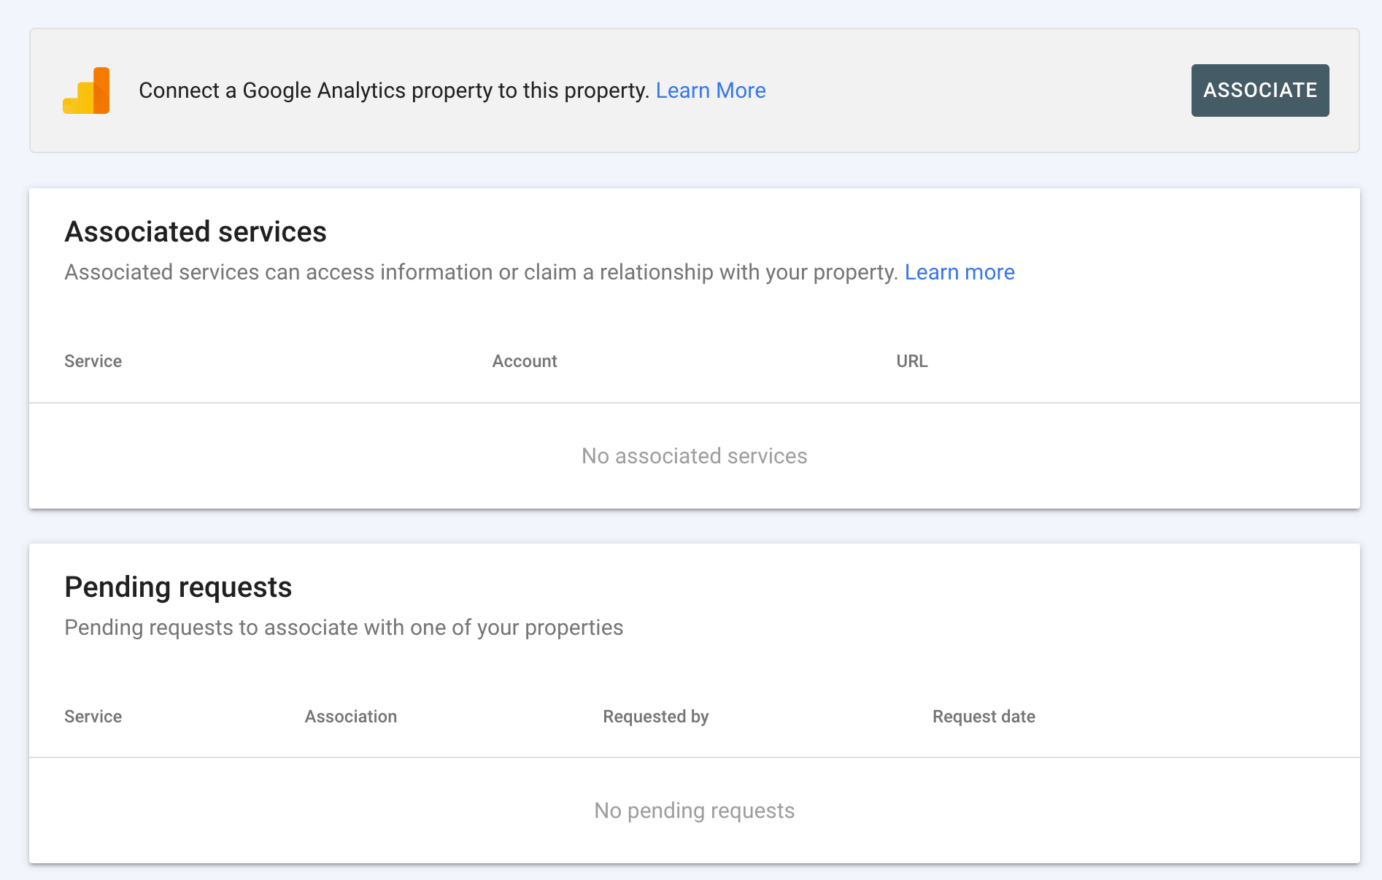
And you’re all done!
That’s it. Now you know how you can create a basic Google Search Console property and how to add a user to your Google Search Console. Your digital marketing agency or your colleagues can now safely access the data and start making data-driven decisions to improve the content on your website.
When you’ve granted access to your Google Search Console account to User Growth, we will begin reviewing your search console account for any actionable items we may need to fix. We typically start by looking at any (negative) manual actions that may prevent your site from appearing on the search result pages to 404 errors which need to be redirected to a (replacement) page, to missing sitemaps, which may cause indexing issues. These easy and quick fixes can still cause major issues with search engines if left untouched, so that will be the starting point for a successful collaboration.