
Google Tag Manager is a powerful tool that enables you to manage the tracking codes efficiently, also known as tags, on your website or mobile app. These tags provide valuable insights into user behavior and allow you to measure the success of your advertising campaigns, improve your website analytics, and gather information about your users.
With GTM, you can easily add, edit, and manage these tags without directly modifying your website’s code, streamlining the process and saving time.
In this guide, you will discover the steps to granting access to Google Tag Manager’s tag management system, enabling others to view and utilize your account. After properly setting up Google Tag Manager, you have the ability to select from a range of permission options, providing varying levels of access to the account for multiple users.
Whenever you want to share access to your Google Tag Manager account with your digital marketing agency (like User Growth), you can share the access at either the account or container level.
When you want to share access at the account level, it is called “Account permissions.” The access you can share at the container level is called “Container Permissions.”
This guide will show you how you can do both.
Note: this article is part of a bigger series where we teach you how to share access with your content marketing, SEO, and paid media agency, like User Growth. You can find the other articles by following these links:
- Tutorial: How to Share Access to Google Analytics
- Tutorial: How to add a user or agency to Google Search Console
- Tutorial: How to share access to your Google Business Profile (formerly Google My Business)
- Tutorial: How to add a user or agency to Google Ads
Table of Contents
- What are the different user roles in Google Tag Manager?
- Adding a person to the Google Tag Manager Account level
- Sharing access to Google Tag Manager using Container Permissions
- How to edit user permissions in Google Tag Manager?
- How to request access to Google Tag Manager if you’re an agency or freelancer?
- Why should you use Google Tag Manager?
What are the different user roles in Google Tag Manager?
When sharing access to a Google Tag Manager Container on an account level, it means that all the individual containers that belong to that account are accessible to the user which whom you share the account with. Of course, the level of access depends on what level of access you give on the account level.
Within the Account permissions, there are two levels of access:
- Admin – someone with admin account level access can see and edit all the settings for that particular account, the account activity, and user management (i.e., they can also control who gets access to the account and can delete users from the account too). A person with this type of access automatically inherits the “Read” access to all the containers that belong to that account.
- User – someone with user account level access can see the account settings, the account activity, and user management (to see who has gotten access to the account) but can not edit any setting. When you give someone User permission, they automatically inherit “No Access” permissions for all the containers that are part of that account. So this person can’t see the containers of the account and still needs to be given individual access to each container.
Adding a person to the Google Tag Manager Account level
Adding or changing the account permissions for someone on the account level in Google Tag Manager is pretty straightforward.
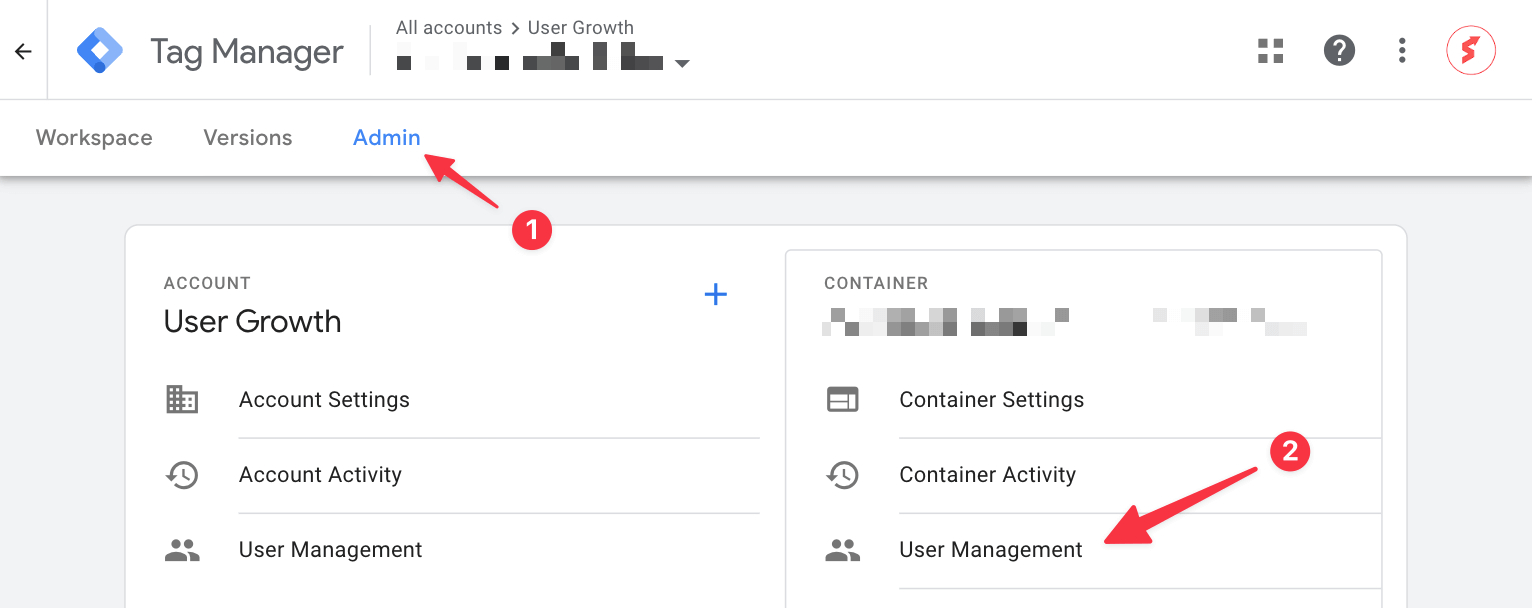
Step 1: First, go to https://tagmanager.google.com/, login, and click the gear icon of the container to which you want to change the settings.

Step 2: If you’re not automatically on the Admin tab, click Admin (1), and then click User Management (2) under the Account column.

Step 3: If you want to add a new user at the account level, select the plus icon in the top right corner (1) and choose either “Add users” or “Add user groups” (2). In this case, we’re choosing “Add users” (2).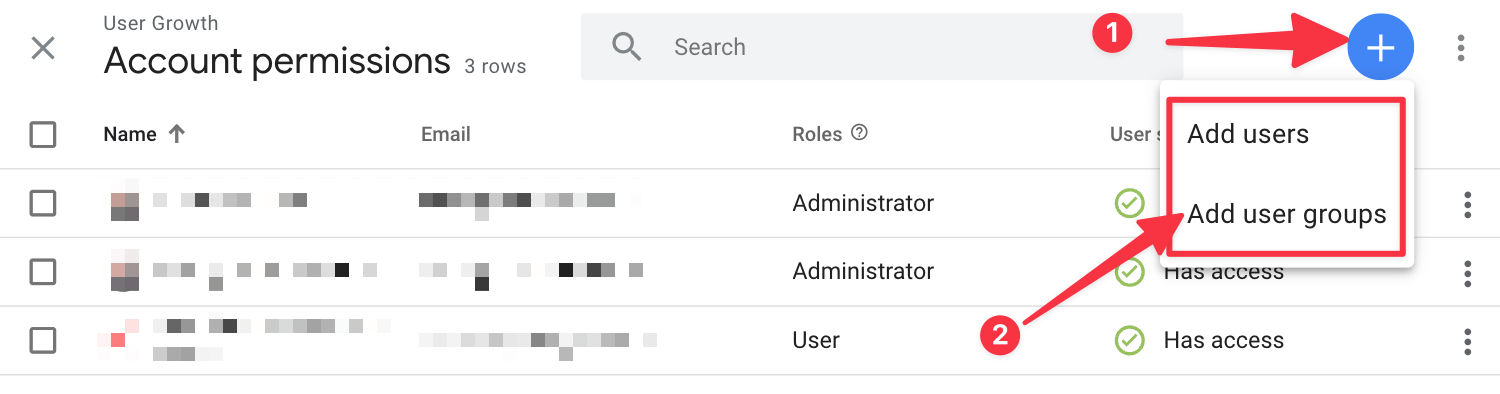
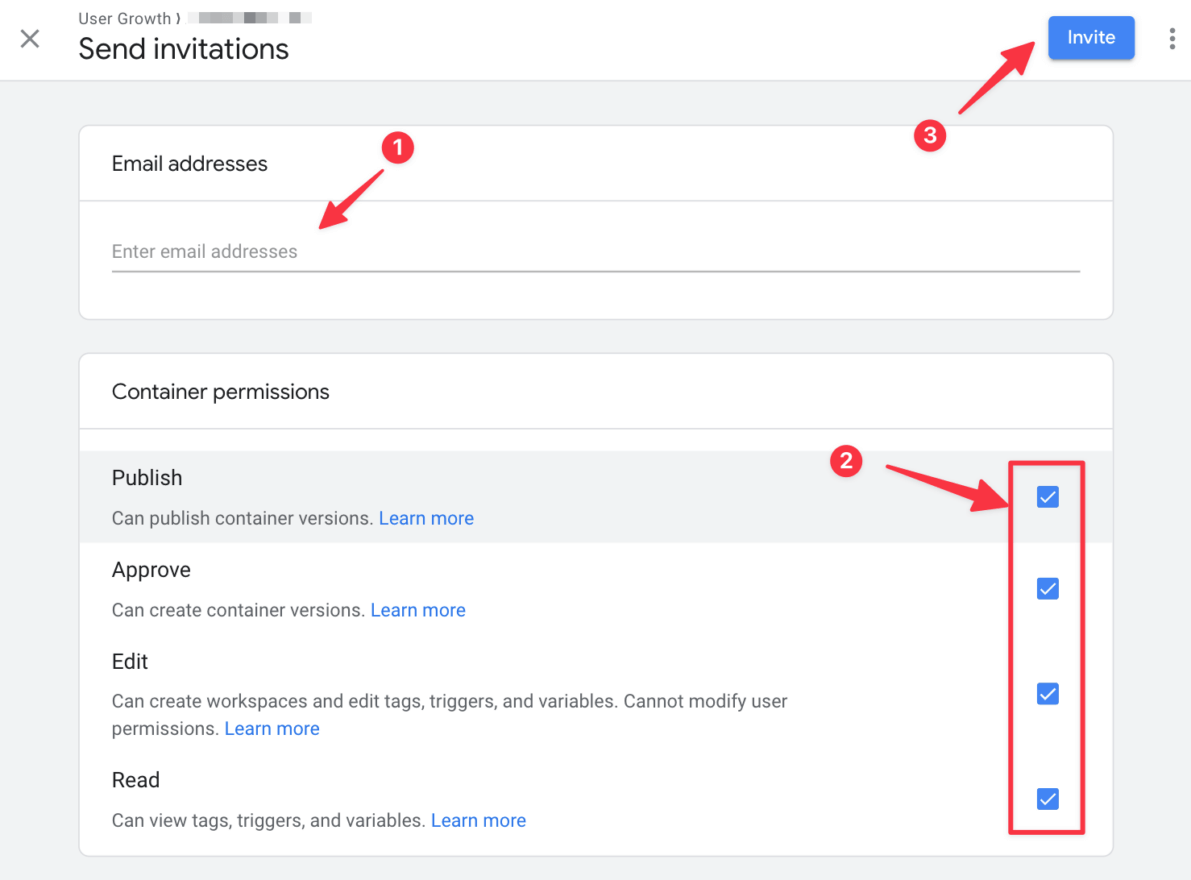
Step 4: Enter the email address (1) of the person or agency you want to share access with and select the Account permissions (2) and optional Container permissions (3) you want to share with the person or organization. After that press invite (4) to invite the person into your Google Tag Manager account.
Sharing access to Google Tag Manager using Container Permissions
If you don’t want to share access to your entire Google Tag Manager account, and only want to give the person or agency that needs to work on your tracking setup access to a specific container, you need to give access on the container level.
The access given at the container level is sometimes also referred to as “Container permissions.”
There are five levels of access you can give someone as part of the container permissions:
- No access – as you might have guessed, if you give someone this access, they won’t see the container listed in their account.
- Read access – if you give read access to a container, the person with this access level is able to see the container and can view/browse the tags, triggers, and variables that are created in the container, BUT will not have the ability to make any changes to them.
- Edit access – each level of access within GTM inherits the access at the level below it. So a person with edit access can read all the tags, triggers, and variables in a container, and on top of that is able to create workspaces and make edits (to tags, triggers, and variables). However, although they have edit rights, they are not allowed to publish the changes they make.
- Approve access – If you give someone approve access, they can create a new version (where you bundle a bunch of changes into one), but they cannot publish it. Of course, this person also inherits the same edit and read permissions at the container level.
- Publish access – Publish access, is the form of access with the highest permissions. A person with these rights can read, edit, and approve the various tags, triggers and variables and on top of that, they also have the rights to publish a container version. Essentially putting the changes created by themselves or others’ live.
If you want to add a person with just permission on a specific container, follow the following steps:
Step 1: First, go to https://tagmanager.google.com/, login, and click the gear icon of the container to which you want to change the settings.
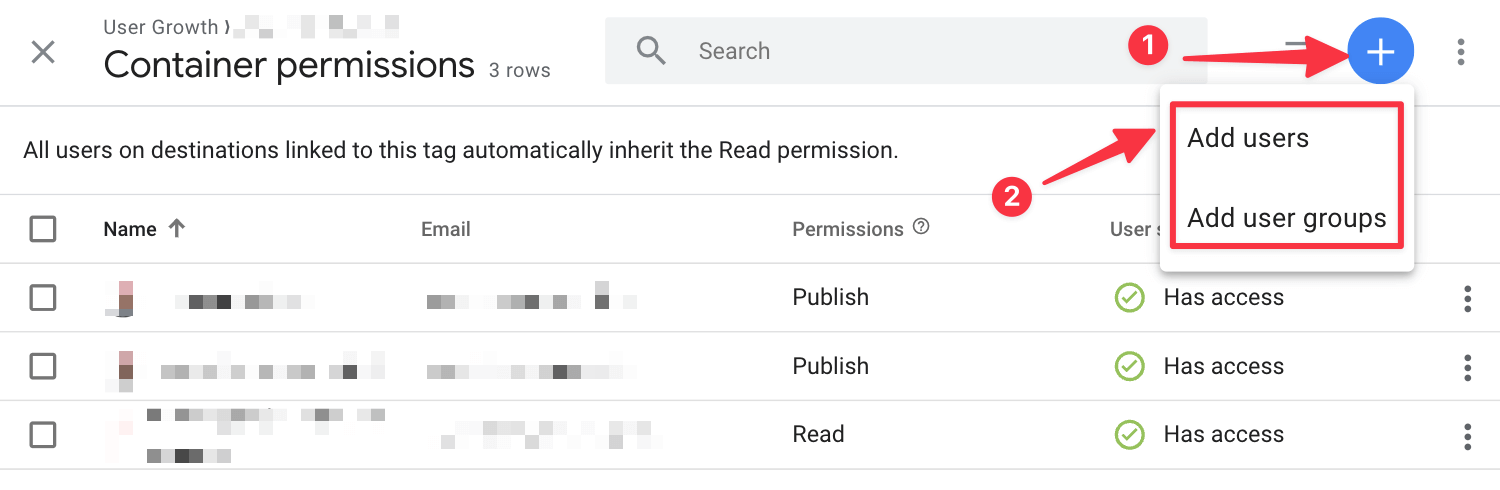
Step 2: If you’re not automatically on the Admin tab, click Admin (1), and then click User Management (2) under the Account column.
Step 3: If you want to add a new user at the container level, select the plus icon in the top right corner (1) and choose either “Add users” or “Add user groups” (2). In this case, we’re choosing “Add users” (2).
Step 4: Now enter the email address (1) and select the appropriate container permissions (2), by selecting them with the checkboxes below. Click invite (2), and you’re all done.
How to edit user permissions in Google Tag Manager?
When you want to edit the user permissions in Google Tag Manager, you need to go to the admin section of your Google Tag Manager account. Just like adding a user on the account or container level into your Google Tag Manager account or container, you can also view and edit user permissions on the account or container levels.
Simply select User management at the permission level you want to modify a person and click on the user or the three dots on the far right. This will open up their account and you can edit their access level to better suit your needs.
How to request access to Google Tag Manager if you’re an agency or freelancer?
Sadly, this is not an option. Unlike with, for example, Facebook where you can ask to be added as a partner to the Business Manager of your client. If you’re a client of our digital marketing agency, we will share the email account(s) that need to work on your account during onboarding, so that you can share the access using one of the two above methods.
Why should you use Google Tag Manager?
If you’re using Google Tag Manager instead of individual tags on your website, it creates many advantages. The six most important advantages are:
- Simplifies tracking and analytics implementation: Google Tag Manager allows users to easily add and manage various tracking and analytics tags, such as those for Google Analytics, Google AdWords, Facebook pixel, and others without you having to modify website code directly.
- Improves website performance: By using GTM, the number of tracking and analytics tags on a website can be reduced, which can lead to faster page load times and improved website performance. Faster page load times ARE a ranking factor for Search Engine Optimization, so that is a big plus.
- Increases flexibility: GTM allows for easy customization and adjustments to tracking and analytics tags, as well as the ability to add new tags as needed.
- Enhances data collection: GTM enables users to collect and analyze data from various sources, such as website interactions and click events, which can provide valuable insights into user behavior and website performance.
- Enhances collaboration: GTM provides a user-friendly interface that allows multiple team members to access and manage tags, which can improve collaboration and streamline the process of tracking and analyzing data.
- All tags are manageable in a single platform. You can modify, test, and debug changes in one single place without having to worry about crashing your website.